

Building Modular Trenches for your gaming boards
Here is a nice little tutorial on how to make modular trenches for Warhammer 40k, or any other miniatures game. Enjoy! (It will take a little while for all the images to load, about 1.3 megs.) I will post more pictures of the begging steps as I make more trenches.
First off you will need some supplies:
1) 1/8" particle board. (and some way to cut it as it comes in 24" x 36" sheets. You can get this at most large hardware stores)
2) balsa Sheets (about 3" wide and 36" long) and small balsa strips (used for the stakes in the ground.
3) Dow foam (for the built up dirt berm at the walls.
4) Hot glue gun (white glue will work too, but it will take ALOT longer)
5) Sandpaper
6) Play Sand (also at most large hardware stores. It is about $2 for a 40 lb. sack)
7) Rocks, flock and other misc. debris that you will want to attach to the trenches.
8) Hot wire cutter (the kind that you plug into the wall)
9) White Glue
10) Wall Spackle or Exterior Stucco patch.
11) Black Latex Paint (water based)
12) Craft paints (black, white & brown)
13) Something to put under the trenches as you are painting them. They will make a mess.
Step 1
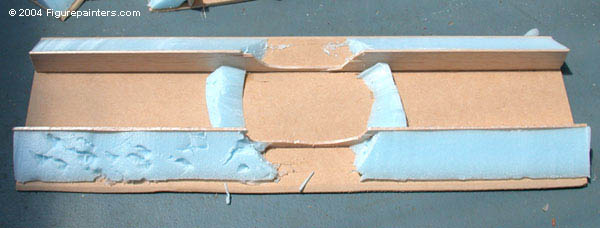
1) First off you will need to draw the layout of you trench system that you are going to cut out of the sheets of particle board. Firstly an overall all design will need to be made. I made my trenches 2.5" wide with 1.5" bank (the built up area on the outside of the trench) You can see some of the guiding lines that I made on the board to make where I needed to cut and where stuff was going to go. Since the trench system is going to be modular and be the same width at the connecting ends I will be making most of the pieces 5.5" wide (2.5"+1.5"+1.5"=5.5"). Some of my more "creative" pieces may be wider of different shapes, but they will still need fit the 5.5" connection that the rest of the more standard pieces will have.
2) Once the designs are laid out on the board(s) it is time to cut them out. I used a jigsaw to cut mine. After they are cut out the edges will need to be sanded round to give it a more natural look on the battlefield. Make sure that the areas where the trenches will connect stays flat.
3) Now cut the sheets of Balsa into 1" strips. These will form the walls of the trenches. Next glue the walls down the trench templates. It is a good idea to mark on the templates where the walls are going ahead of time to make it easier cutting the walls to the proper lengths.
4) Next take the sheet of Dow insulations foam (I used 1.5" thick insulation) and cut off a width of about 1.5"

5) Cut the foam diagonally to get a triangle shape. This will be the angled sides of the trenches. As it is it will be to large and will need to cut down once it has been clued on.

6) Before the banks are glued, the inside corner will need to be chamfered to allow a little room for the glue that is more than likely oozing out the back of the walls.

7) Now that the banks are glued on take the hot wire cutter and trim down the banks so that they are even with the top of the wall and the edge of the trench template. Now the vertical stakes can be glued on as well using white glue.
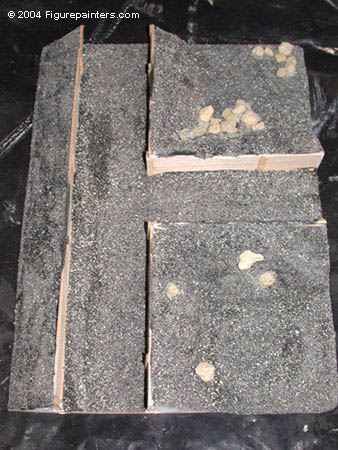
Here are some of the different modular trench sections


8) Now a little variation will need to added to the banks (unless you are making concrete looking banks for a city landscape) using an old knife.

This piece was cut up so that it would look like it was his by a mortar shell.
9) Now take the wall patch spackle and fill ant crack and holes that need it. At this point the spackle can also be used to add variations to the flat ground in and outside of the trenches.

10) Now the outside of the trenches will be painted and coated with sand. I did the outside and inside separately so that there would be less mess and the trenches would be easier to handle as I was painting them.

10.1) First paint a thick coat of paint over the banks of the trenched. be careful not to get any on the top of the wood (wipe up as necessary)

10.2) Pore the play sand on top of the wet paint. Let dry completely before shaking off the excess sand.

11) Now if I will be gluing the rocks (using white glue) onto the banks to add a little variation to the terrain.


12) Now paint and cover with sand the inside of the trenches being careful to keep the paint off the inside walls.
13) Once all the paint is completely dry, paint the WHOLE thing. This will permanently adhere the sand and give you a nice black base coat to paint over. It will take a while for the paint to dry completely.

14) Now that all the paint is dry, take the brown craft paint and apply a liberal drybrushing to the trenches. Don't worry about getting paint on the wall to much as these will be painted a different color later. (Or use your own color schemes to match the existing terrain that you already have)


15) Once the first coat of brown is dry, mix some brown with a little white on a piece of newspaper and drybrush this lighter color over the trenches.

16) Add a little more white to the mix and drybrush again. This time a little lighter than before.

17) The final drybrush was mostly white with just a little bit of brown in mixed in.

18) Mix some black and white paint on the newspaper until you get a medium gray and paint the walls and rocks with it.

19) Mix more white into the gray and drybrush again to add a little shading to the walls and rocks.

20) Lastly add a little static grass and any other tidbits to the trenches to finish them off to your taste. Now you have somewhere for you troops to hide :)
